

Install and Setup IBM Access Client Solutions (ACS)
IBM Access Client Solutions supersedes the former software application called IBM Access Client for Windows. This new application is compliant with current security standards and is the only such software supported by IBM on Windows 10. The older software is no longer supported by IBM and thus requires this new software to replace it.
To install the new IBM ACS, first make sure you are connected to the Colonial Williamsburg VPN if you are working from home. It is not recommended to install this while connected to your work computer through a Remote Desktop Connection from another offsite computer.
Video Tutorial: Click here for a video tutorial about the below.
Click on Start on your Windows computer. Find the pre-installed software called Software Center under Microsoft System Center in your list of programs and click it to open it. Software Center will display several applications pre-approved by Colonial Williamsburg's IT staff for use on CW computers. IBM ACS will be listed. Click on the icon labeled "IBM ACS 1.1.8.4".
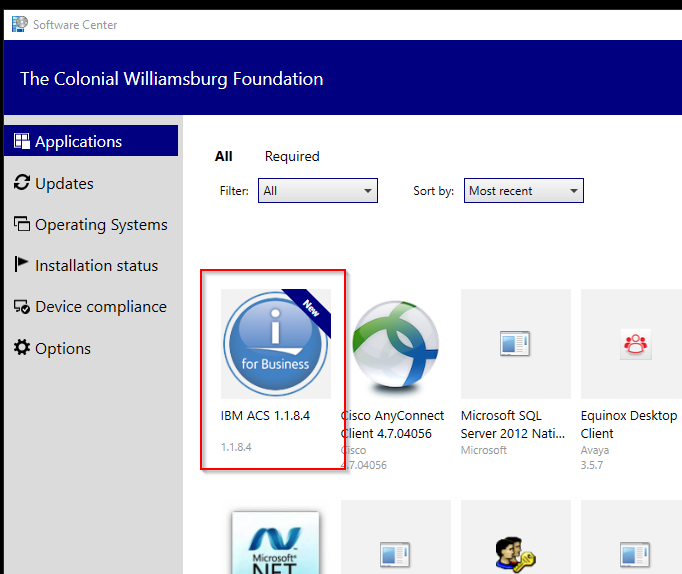
On the next screen, click on the "Install" button. If you already have it installed, it will show an "Uninstall" button.
When the software is installed, you will see the following four icons appear on your desktop. Any former icons used by the previous IBM software should disappear.

You are probably used to double-clicking the Admin icon to launch the Admin system. This will remain true.
After launching the Admin (or Test) icon, complete the following steps to secure your connection. NOTE: Failing to do these steps will cause your application to not work once we stop allowing unsecure communications in Q1 of 2021.
As the Admin system is launching, it should show a login prompt. Cancel this pop-up prompt.

Click on the Communication drop-down menu and choose Configure…

Click the dropdown menu for Protocol and select "Telnet-TLS/SSL". Then press OK.
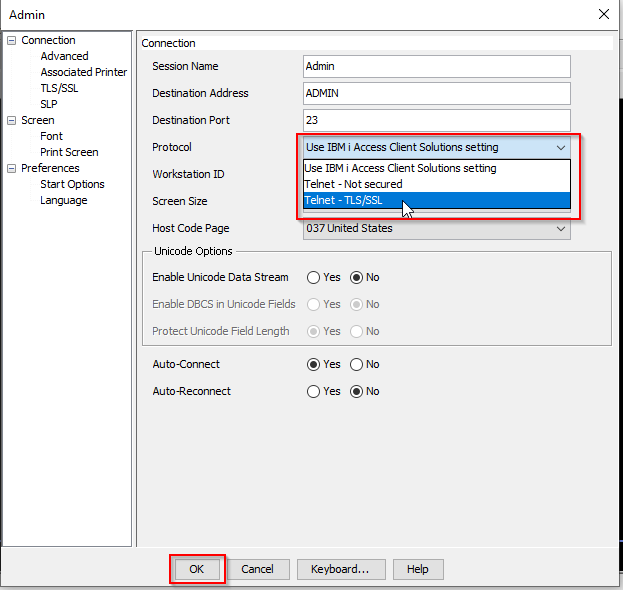
You should get a certificate warning and you should click "Yes" to trust the certificate.

Once you have made this change, your connection to the Admin system will refresh. Use your Admin system's login credentials to log in. Your password will still be the same as it was before.

Please take the time to complete the following steps, also.
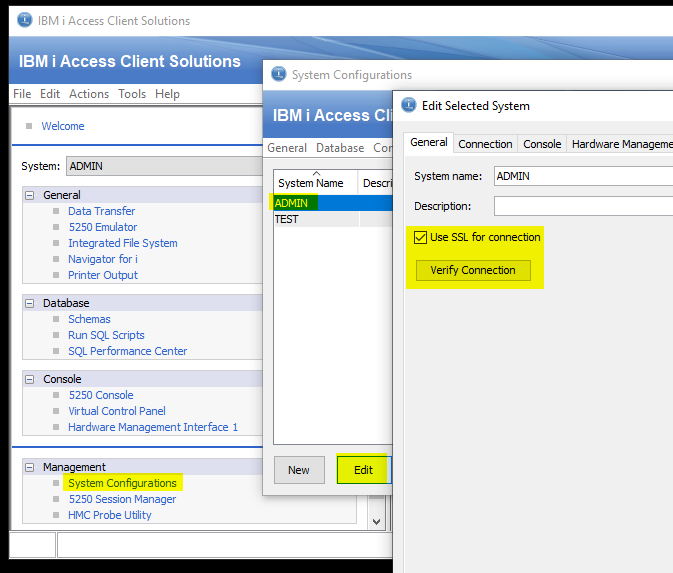
Open the Access Client Solutions dashboard by double clicking the blue Access Client Solutions icon on your desktop.

When it opens, it will look like this:

Click on "System Configurations", then highlight ADMIN and press the Edit button. Check the box next to "Use SSL for Connection". Click the "Verify Connection" button. If you are prompted to trust a certificate, click yes. The connection verification screen should show all green checkmarks except one, the Secured Shell one will be a red X, and that is expected. Press OK and repeat this with the Test system.
When you have done this correctly, every time you open a ADMIN or TEST session, the screen will show a closed pad lock in the bottom right corner.

Overview
Content Tools
Apps