

Square Terminal Passcode / Passcode Resets
- Access to the Square Terminal is by user, and requires a unique passcode per user.
- Should anyone need a different passcode for any reason, the following should be able to reset it for the user on the Square Dashboard (online):
- user's manager who is setup with catalog access
- Square user with Information Technology access (IT Square product owner), OR
- System Administrator access (Accounting) user
Square Training
Most of the training/help for Square is available on-line, and is included as links in the user checklist that should have been accessed by the when first setup. Reference the training links on that page: Square Training Checklist
Square Dashboard
Square dashboard is available as an access point granted to different permission sets in Square, including: “System Administrator,” “Information Technology,” “Accounting,” “Catalog & Manager,” and "Catalog & Invoices Manager"
When these users are setup in Square, they will be sent an email to create their Square Dashboard (online) account. If they do not get that link OR need it resent, a "System Administrator" user can resent it through the Square Dashboard
The modules a user sees when logging into the dashboard depends upon the permissions to which the user has access. Here is an example of a privileged user’s view:

Square Items & Categories (Catalog Management) Tips/Reminders
Certain manager users, in addition to system administrators, have the ability to create Items and Categories. ALL sales in Square should be itemized sales (e.g., driven from the POS Library of items) in order to facilitate proper tracking and accountability of the sales. This allows management to review the Item Sales reports and know exactly the volumes and amounts sold, down to the items we’re selling. Adding, changing, or deleting an item can (and should) be done on the Device OR on the Square Dashboard, and changes get pushed to the devices when done this way.
Category Recommendations
The Square Terminal’s Library view in the POS allows us to filter the display by the Categories. As such, it is recommended that when multiple business requirements are using a shared library, that the predominant things their Sales Associates are selling be available either easily via Category usage, and the Library items can be filtered to an appropriate Category at a time for ease of selling.
Category Naming Convention for Business Area Mapping to one GL
In the case of a new business area being added to sell items in Square, when that business area maps to one GL account, it is requested that the Category for the business unit include the first four digits of the GL in the Category Name, as the last four digits of the name. For instance, the Weaver shop has been adjusted to have a category name of “Weaver 0732”
Square POS Additional Tips/Reminders
Covered in training videos, but calling out a few key things sales associates might need to know quickly:
Include Donations
No matter what is being sold, there is a Donation category with a Donation item, all Sales Associate training includes steps to accept donations via this link, also included in the user training checklist: Square - Take Donations Instructions
Adding Customer Information (especially for Donations)
Customers can be added during the sale, from the "Current Sale" and then selecting the "Add Customer" in the dropdown arrow on the upper right, collecting the appropriate information on Customer screens.
 Customers can also be added at the time of sale, on the Receipt screen. See the Square Training Checklist for Square videos on adding the customer.
Clearing the Cart
To clear the entire cart, navigate to it by clicking the “Current Sale” at the top of the screen, then click the dropdown on the upper right, and choose “Clear Items” (see above image)
Changing Items in the Transaction (Change Quantity, Remove Item, Notes, Discount)
If you’ve added an item to the cart and it needs to be changed, click into the Current Sale at the top of the screen, then click the item where you can have a variety of options for changes to that item, including Quantity, addition of notes, adding a Discount, Comp the item (if permissioned), or Remove the item from the cart.
Adding a Discount
If you know this as the item is being added to the cart, apply it in that screen. Otherwise, you can edit it once it’s in the cart by clicking on the “Current Sale” link at the top, then clicking the item itself, and setting the Discount in the section at the bottom. Discounts are applied item by item so add them to the item(s) to which they apply only. Make sure you are aware of your business units policies on allowing discounts or not. If your business unit DOES allow a discount, make sure only a max of ONE discount is applied per item.
Note: if an expected discount is missing, coordinate with Accounting so that the System Administrators, who have ability to add and edit these, can ensure it gets added for future use
Processing a Refund
A refund can be applied (if necessary AND in accordance with business policy) after the transaction has completed, by navigating to the 3 bars in the upper left of the Terminal, and choosing [Transactions] from the menu. Select the transaction that is required by clicking it, and then click the [Issue Refund] button, confirm the item(s) to refund, and click [Next], select the reason for refund, and then click [Refund]. If the customer desires a receipt, this will have to be manually produced, as it does not get run or sent automatically by Square.
Offline Sales
If the Square Terminal loses connectivity, they are setup to allow offline sales (this is a toggle setup when the unit is setup). Your Square Terminal will show that it is offline, and still allow you to check out so long as the total amount in the check out does not exceed the max offline per-transaction limit for that device. For most of the devices we've setup, the amount is $50, and this can be adjusted with business unit justification up to a max of $150 per transaction – any change to this setting must be made by someone with administrative access so it should be coordinated through the Square administrators/product owner.
Must Connect to Wi-Fi Within 72 Hours to Avoid Forfeit of Payment for Offline Sale
Important: any offline sale processed MUST requires the device to be connected successfully to WiFi within 72 hours of that sale for the transaction to process.
Steps to Reconnect to CWF-Special Wi-Fi
On the Square Terminal, click the menu in the upper left corner three line and go into Settings > Hardware > Network
- Confirm Square Terminal is connected to Wifi on this screen (e.g., CWF-Special).
- If not connecting, you can Toggle Wifi off and on here
- Check to make sure that you see a checkmark next to the network to which you are trying to connect (CWF-Special).
- Confirm that you see the Wi-Fi status indicator on the top right corner of the status bar.
- If you cannot connect, contact the Helpdesk for assistance
Load Receipt Paper
The Square Terminals have a built-in printer. To print receipts on your Square Terminal, you’ll need to first load your paper:
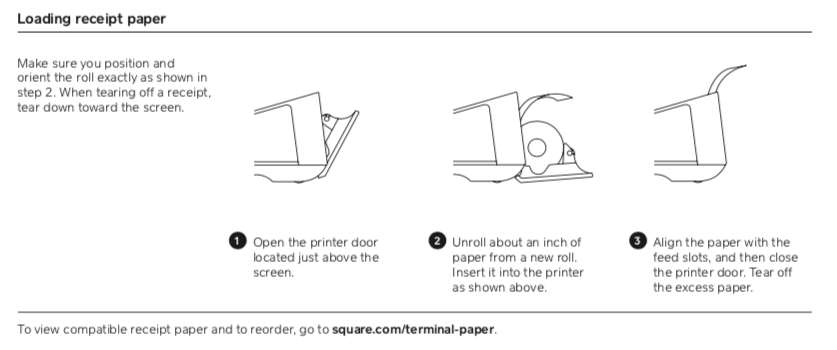
Open the printer door, located above the screen on the top of your Terminal.
Unroll your new printer paper slightly, set it on the printer door with the unwound paper on top, and the loose end facing out of the Terminal, away from your screen.
Ensure your paper follows the curve of the roll and it is not bent. Close your printer door and tear the excess paper towards the screen.
You’re all set! If you have correctly inserted your printer paper, you’ll be able to print your customer’s receipts. If your receipts don’t print, you may need to reorient the printer paper. You can test your receipt printer by heading to Settings > Hardware > Printer > Test Print.
Note: When tearing receipts for your customers, it’s best to tear the paper toward the bottom of Square Terminal. Pulling the paper away from the screen may cause the printer door to open.